The tensile testing machine is also called a universal testing machine. The named is universal because it can perform over different kind of materials. This machine can be used for a variety of materials for tensile strength testing, compressive strength test, tear test, bending test and so on. Since this machine can be used on a variety of material, so the test procedures will be different. Here, we introduce the tensile test procedures for the tensile testing process.
1) Prepare specimens
Before starting the test for tensile strength, the specimen needs to be prepared in advance. The specimen can be cut using a Dumbbell cutter. Once the mould is whole, the sample will take on the shape of a slim dogbone or dumbbell.
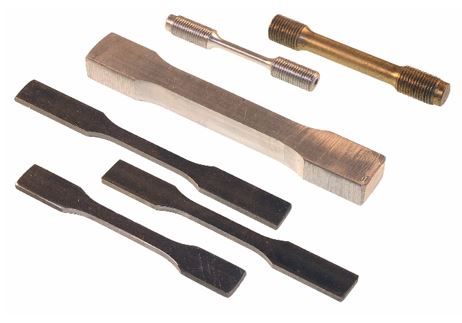
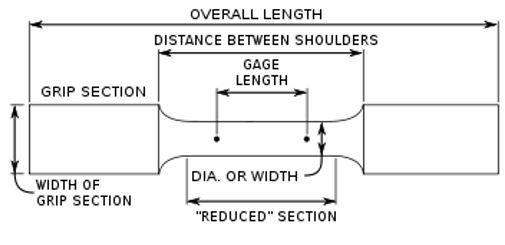
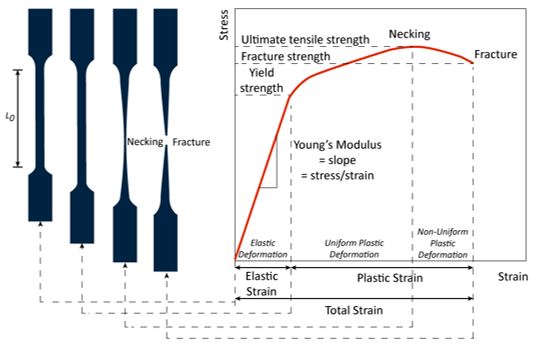
The tensile test specimen is known as dogbone or dumbbell. The dogbone for tensile testing is designed to have two opposing shoulders connected by a narrower cross-section. Each end of the specimen is gripped in a tensile testing machine, which applies tension until the specimen breaks. This narrower cross-section is designed to be a predictable point of failure in a tensile test. The cross-section can be round or rectangular in shape.
2) Change the test setting
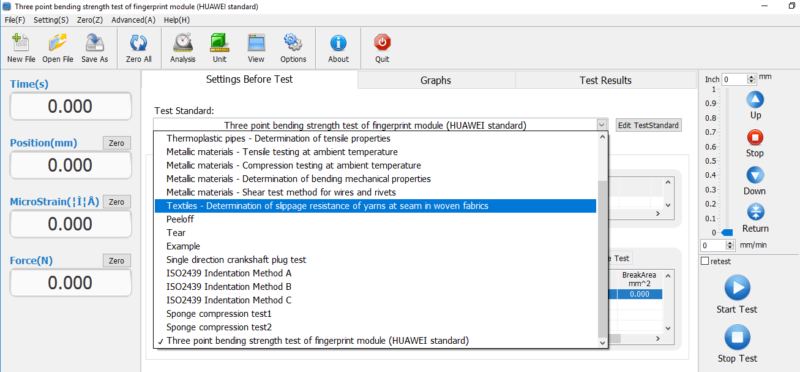
The tester needs to change the settings on the software before starting the test. This is because each test requires the correct settings according to the test standards. This setting also depends on the type of test to be performed and also depends on the type of material.

3) Choose the correct test standards
The tester needs to choose the correct test standards on the software before starting the test. The test standards a set of rules or standards that are expected to be met in a particular product. The selection of test standards is very important because to ensure that the test results meet the set standards. The test standards also depend on the type of test to be performed and also depends on the type of material. Examples of test standards found in the software are ISO, ASTM, EN and others.
4) Install the specimens
Position the lower and upper clamps in their proper position to accommodate the length of the test sample. Next, place the material between the tensile clamps. First, clamp the test piece in the upper clamp, then move the lower clamp to the proper clamping position, and finally clamp the lower end of the test piece.
The installation of specimens is an important part of the testing process. The tester skills and the type of grip used for the test play an important role. Specimens made of fragile or brittle substances require the utmost care and caution during tensile tests. Mishandling of specimens with the wrong equipment can have a negative impact on the results. It may even cost the specimen and testing needs to be done again.
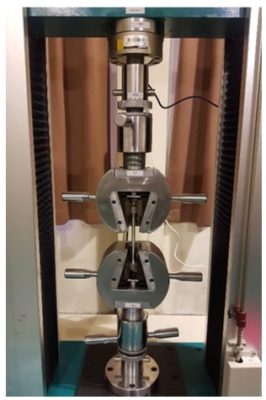
After installing the specimens, attach the extensometer to its length. While it undergoes testing, the extensometer will be monitoring and measuring any changes in the material. After the extensometer is placed, double-check the other equipment to make sure they are in their correct positions.
5) Start the testing
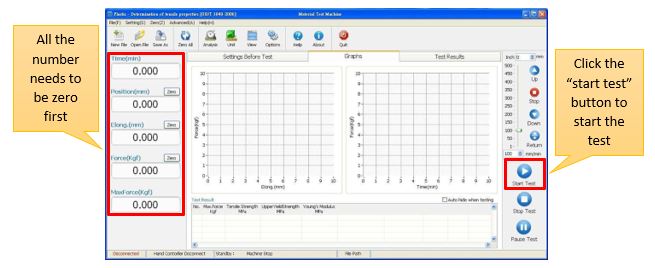
To begin the tensile stress test, slowly separate the tensile clamps at a constant speed. Depending on the size and shape of the material. The tensile testing would often take five minutes or less for the material to fracture.
During the test, the specimen will slowly elongate with the standardized speed. The data gathering software will present the material’s test parameters, as well as the changes in the gage length. It will monitor the force placed upon the specimen and display the stress-strain curve. The stress-strain curve is helpful in analysing the specimen’s behaviour throughout the test.
6) The end of the experiment
After the fracture, unlatch the specimen piece from the tensile clamps. The tester should check the test record to ensure the results obtained are correct and accurate. In addition, the tester must ensure that the test equipment is in good condition after the test is completed. The test area needs in clean condition. Finally, organize your data and complete the test report.
In fact, in the actual test the universal testing machine testing procedure will be slightly different. This is because due to different test materials, different test standards and the manufacturer tensile machine is not the same.